InfinCE Calendar is a workplace tool for efficiently collaborating with others, planning, and allocating time. It helps you schedule meetings and holidays. You may create events, add calendars, and subscribe to any user’s calendar. Email notifications will be sent while creating, editing, or deleting an event.
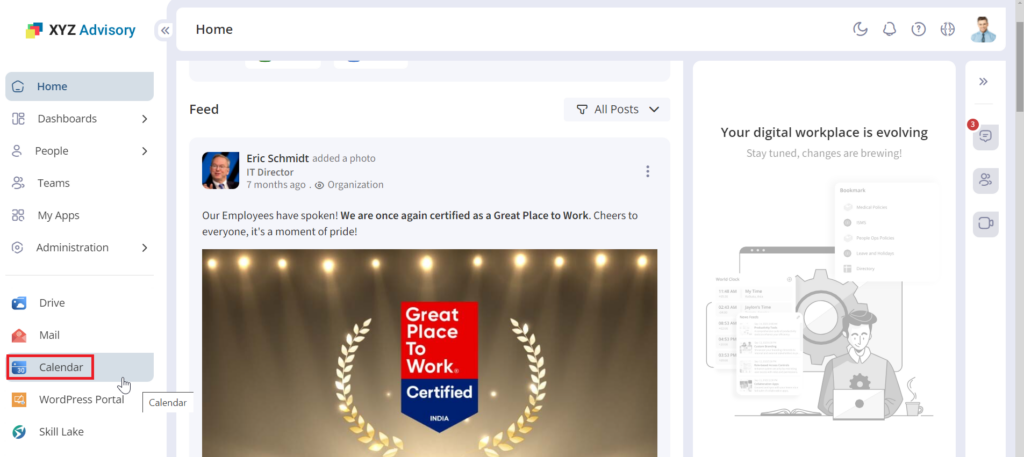
Click on the Calendar menu from the InfinCE Workplace to open the InfinCE Calendar in a new tab.
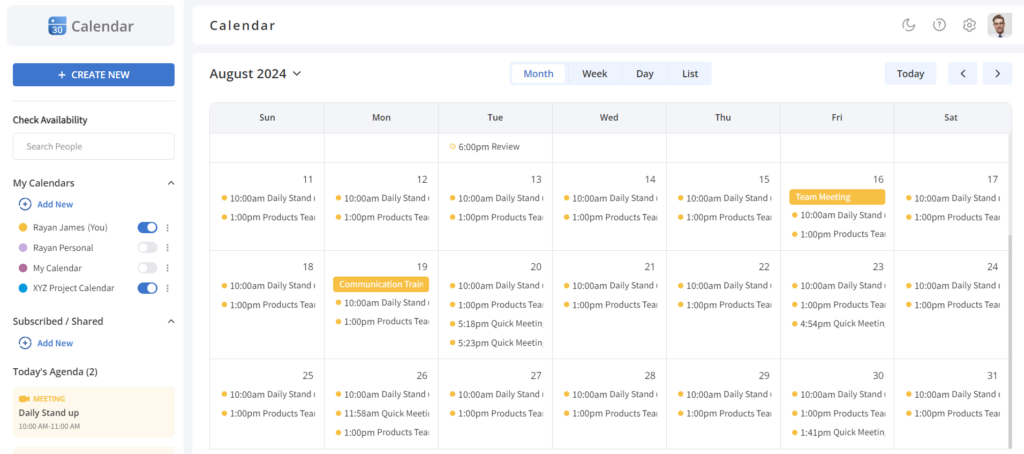
Create a new event
To create a new event, click on the cells of the calendar or Create New button.
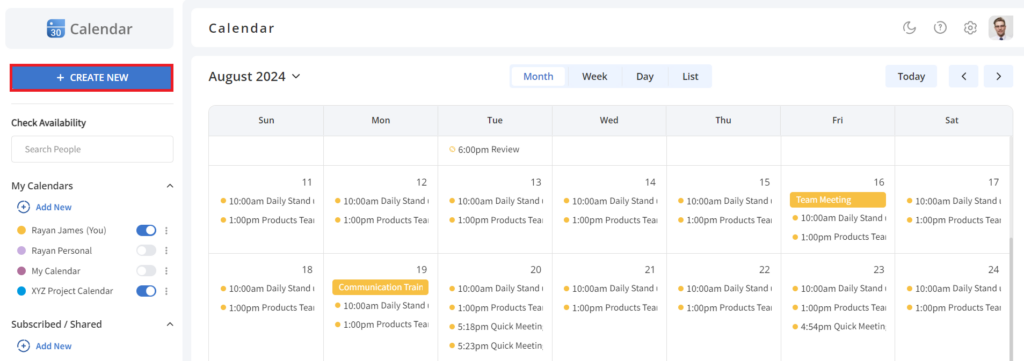
The Create New Event pop-up will appear when clicking the Create New button.

Provide the event details,
- Enter a title for the event.
- The event date will be displayed as the current/selected date. You can set the date and time or make it an all-day event. You can also select the preferred time zone and event recurrence.
Note:
- The duration of the event will be displayed based on the default duration set in General Settings.
- If an event lasts an entire day, you can create an All-day event in the InfinCE Calendar and update your free/busy status.
- When creating an event in the ‘Month’ view, the default duration is All Day.
- Add participants for the event. You can add the InfinCE workplace users, guest users or external users. You can make the users required/optional participants or moderators. The moderator role is applicable only if the event is an InfinCE (online) meeting.
Note: For added convenience, the platform allows you to quickly copy and paste the participants, making the process of adding them to the event even easier.

In the Participant Permissions, select:
- ‘Modify event’ if you want to provide edit permissions for the events for the participants.
- ‘Invite others’ if you want to let the participant invite other participants to the event.
- ‘See participants list’ if the participants need to view the event members.

- Add an InfinCE meeting link or external link for the meeting.
- Select the name of the physical meeting room where you plan to conduct the event.
Note: You can book various conference/meeting rooms at your office.
- Add a description for the event.
- You may set a color for the event to organize and differentiate your events.
- Click on the Create button to create the event. An invitation email will be sent to all the event participants.
- The Calendar displays all the events created.
Recurring events
InfinCE Calendar gives the provision to create recurring events. You can set the recurrence for the event by selecting from the default options available, such as daily, weekly, weekdays, monthly, or yearly for that specific day, or by creating a custom recurrence as per your need. The organizer and the participants will receive a notification email with the event details.

Click on the ‘Custom’ option to set an event recurrence not included in the default choices.

You may repeat the event for specific days, weeks, months, or even years.

You may limit the recurrence by setting the event end date, specifying the number of recurrences, or setting it as a never-ending event.
Editing an event
As an organizer or user with event edit permissions, you may edit existing calendar events. To do so, open the calendar event, click the three-dot icon, and select the Edit option.

You may edit the event details as required.
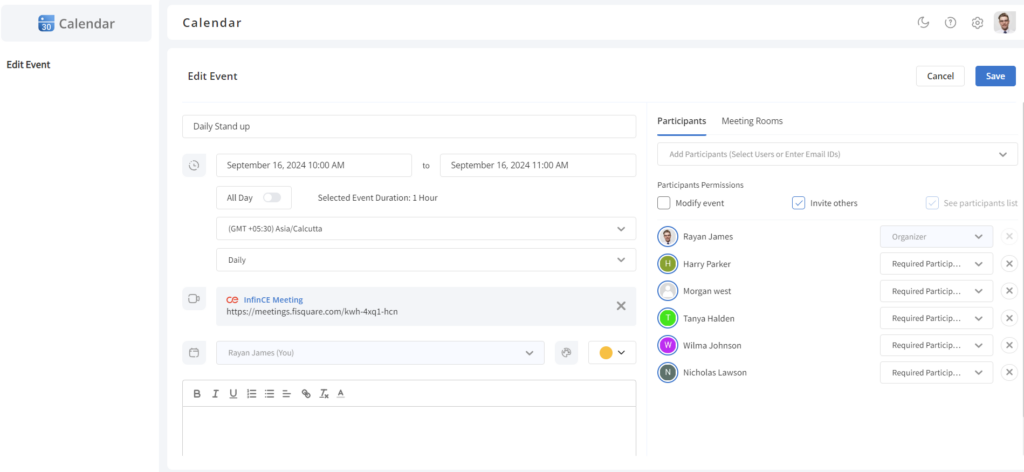
Click on the Save button to save the changes made. On saving, a confirmation message appears. By default, update emails will be sent to the participants. If you do not want to notify them, you may uncheck the option.

You may choose the required option and click the Okay button.
Note:
- Choose the ‘This event’ option to update the changes for the selected date of the event.
- Choose the ‘This and following events’ option to update this and upcoming events.
- Choose the ‘All events (Past and following events)’ option to update the changes for the selected date of the event, past, and upcoming events.
Delete an event
You can delete the events. Open the calendar event, click the three-dot icon, and select the Delete option.

On clicking the ‘Delete’ option, a confirmation message appears. Choose the required option and click the Delete button. The event will be deleted from your calendar. The deleted event will be moved to the recycle bin. You can retrieve the event within 30 days, if needed. The event participants will receive an event cancellation email, which will delete the event from their calendar.
Note:
- Choose the ‘This event’ option to delete the selected event from the calendar.
- Choose the ‘All events (Past and following events)’ option to delete all the events including past and upcoming events.

Calendar View
The default view of the calendar is month view while you access the calendar for the first time; switch to week, day or list view as per you need. The last accessed view will be the default one next time.
Month view
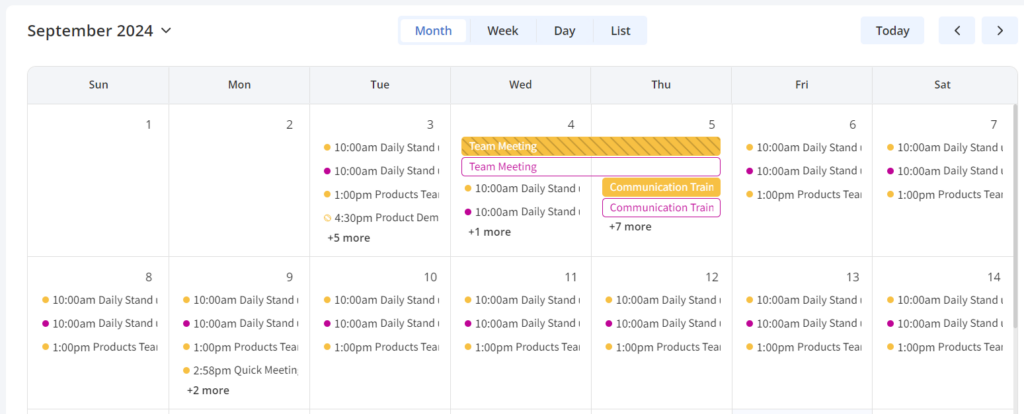
The Month view displays the events of all days of the month.
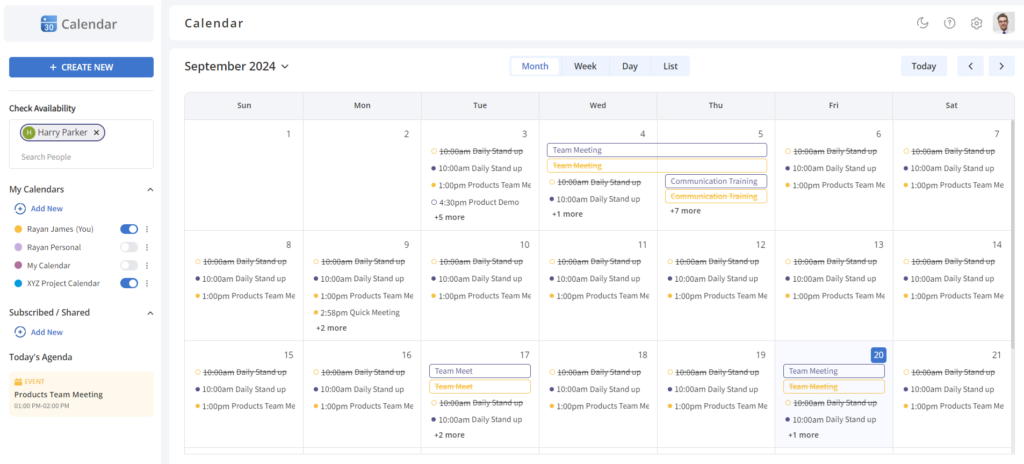
In the Month view, the events will be displayed as:
- Solid circle for the events you have marked your response as ‘Yes’.
- Striked circle for the events you have marked your response as ‘No’.
- Slanted lines in the circle for the events for which you have marked your response as ‘Maybe.’
- All Day events will be displayed as a rectangular box.
- Outlined circles for the events you have not marked your response yet.
Week view
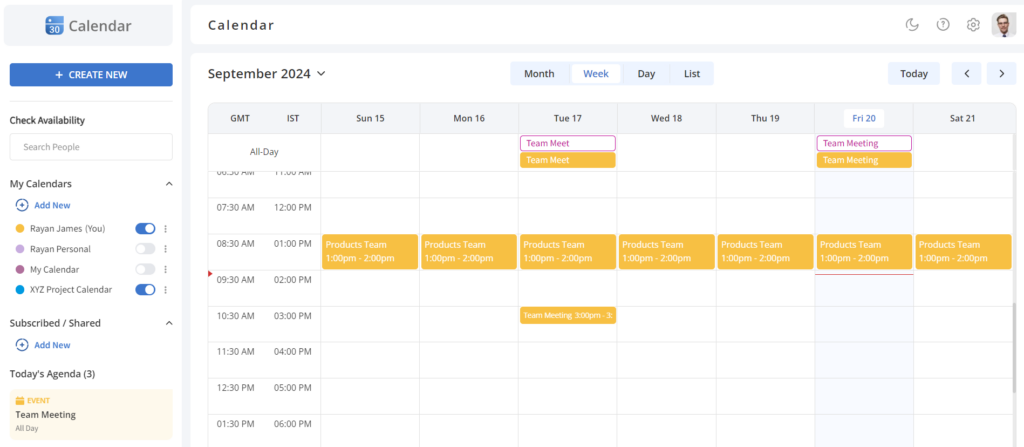
The Week view displays the events for 24 hours on all days of the week. The events that occur at the same time will be displayed in a stacked format.
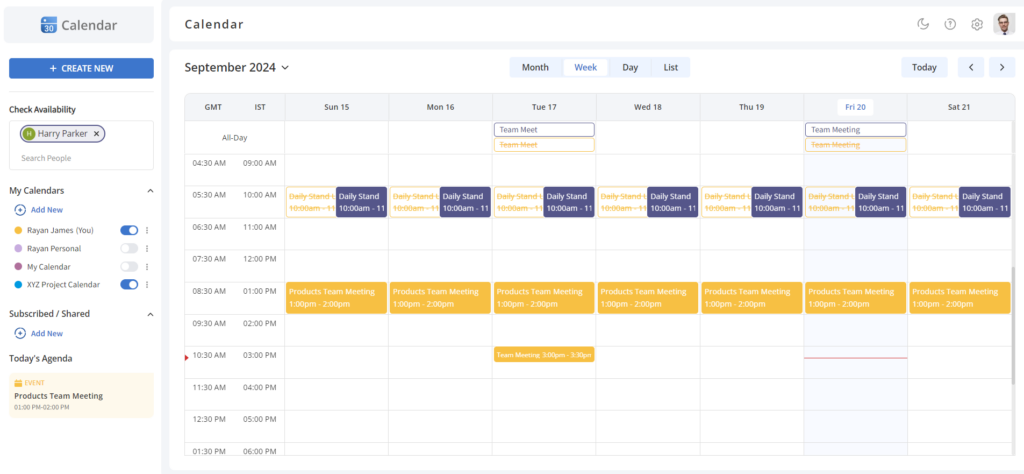
In the Week view, the events will be displayed as:
- Solid rectangle for the events you have marked your response as ‘Yes’.
- Rectangle with strikethrough for the events for which you have marked your response as ‘No’.
- Slanted lines in the rectangle for the events for which you have marked your response as ‘Maybe.’
- All Day events will be displayed as a rectangle in the solid color band on the top row of the respective date.
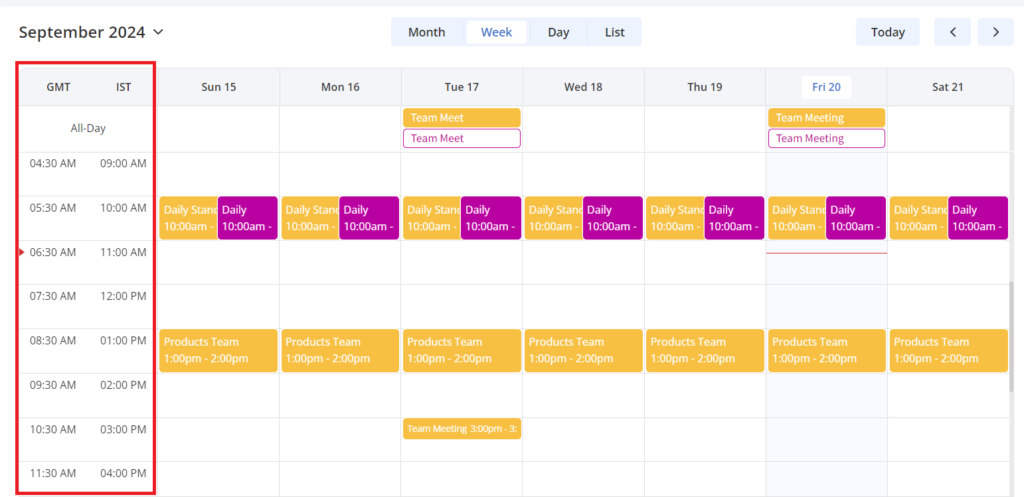
Note: The secondary and primary time zones will be displayed on the left side of the calendar according to the user’s General Settings.
Day view
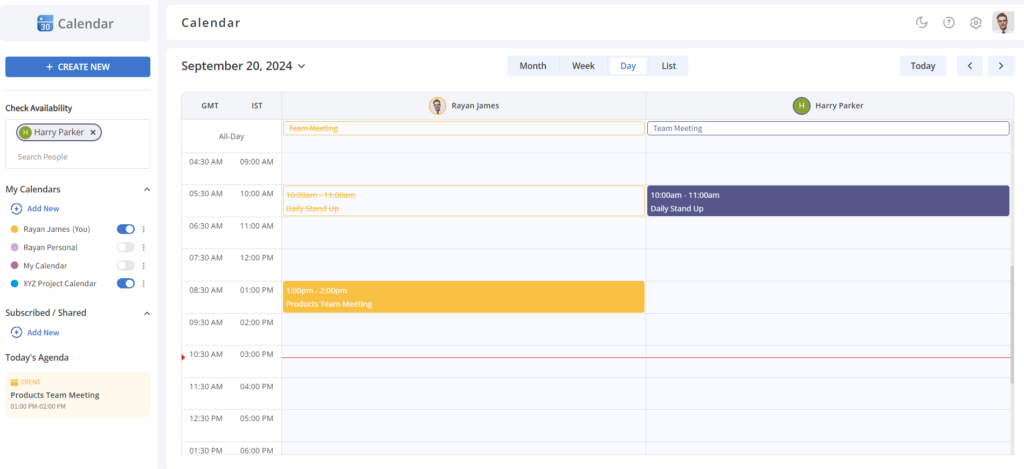
The Day view displays the events for the participants within 24 hours of the selected date. In this view, you can view the calendars side by side. The Week and Day views have the same event representation format.
List view
The List view displays all the events in a compact format.
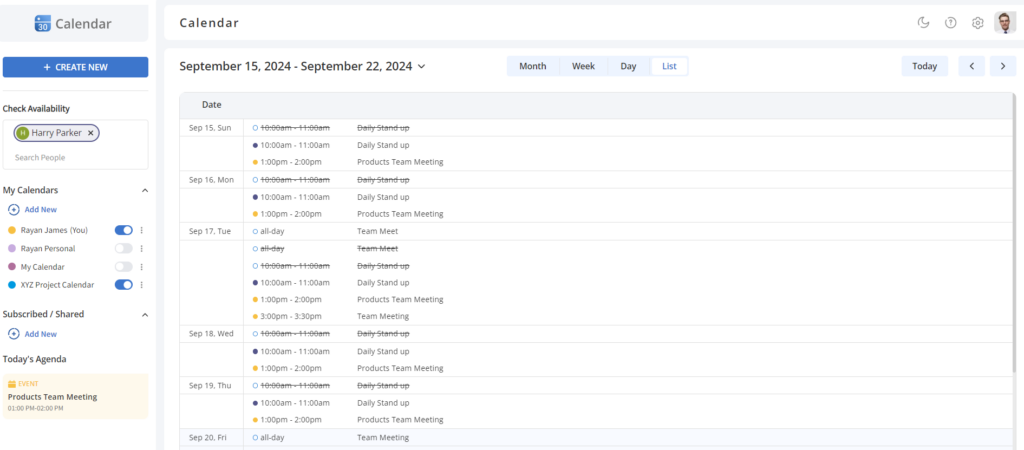
In the List view, the events will be displayed as:
- Solid circle for the events you have marked the response as ‘Yes’.
- Circle with strikethrough for the events marked response as ‘No’.
- All Day events will be displayed on top of that particular day.
- Outlined circles for the events for which you have not marked your response.
Note: Events will be shown according to the primary time zone in the list view.
Check Availability of users
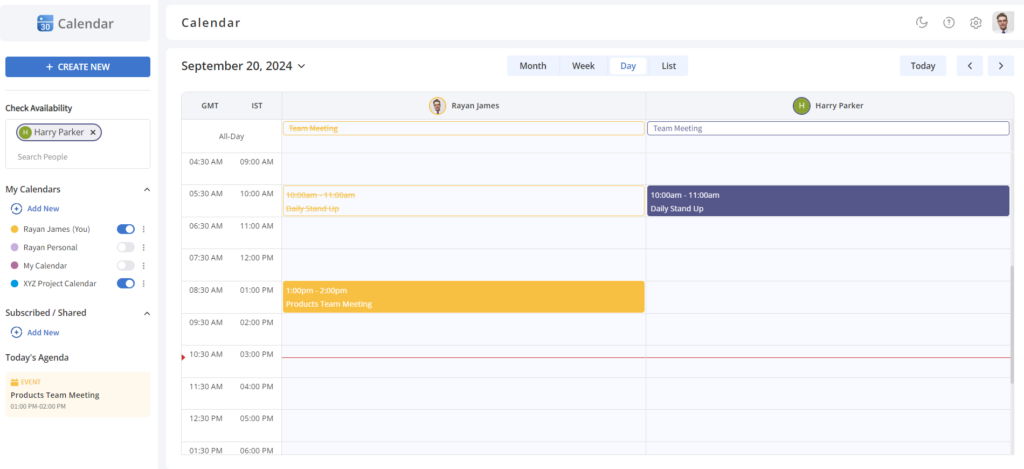
Before creating an event, you can check whether the participants are available for your chosen time. You may enter the participant’s name in the check availability text box. All the events scheduled for the participant will be displayed in the calendar. You will be able to see their calendar with all events.
Note:
- The event visibility will be based on that user’s calendar settings.
- You will be able to view the calendars side by side in day view.
- In the Month and List view, the events of the user whose availability has been checked will be displayed as circles in the user’s color.
- In the Week and Day view, the events will be displayed as rectangles in the user’s color.
Add new calendar
A default InfinCE calendar will be available for the users mentioned as (you), but it is also possible to create a new calendar. Click the + Add New button and select the ‘Create new calendar’ option.

In the ‘Create new calendar’ pop-up,
- Enter the name and description for the Calendar
- Select the Primary Time Zone
- Click on the Create button.

The Calendar created will be displayed in the My Calendars list.

Calendar
Toggle this option to view/hide the calendar events. The events of the enabled calendar will be displayed in the Calendar.
Calendar Configurations
The Calendars created will be displayed in the My Calendar section.

Click on the three dots to see the various configuration options available:
- Display this only to display only the selected calendar events.
- Change color to change the calendar color. This color will be displayed for the events in the calendar and help you track your events.
Note: If the user has manually changed an event color, then it color will not get affected even if you change the calendar color.
- Delete calendar to permanently delete the calendar from this account. Once you have deleted the calendar, you will no longer be able to view/attend the events in that calendar.
Note: You will not be able to delete the primary calendar.
- Settings to update your calendar settings.
Calendar Settings
Basic Settings
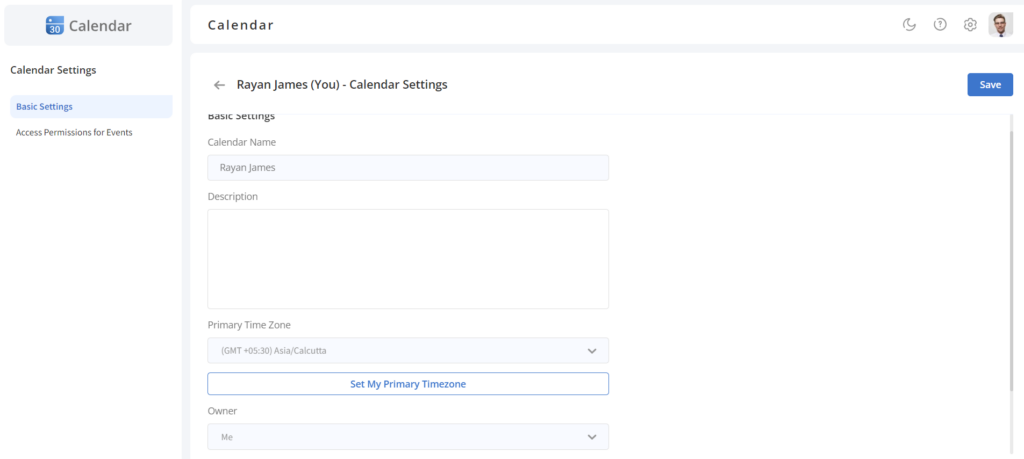
The Basic Settings of the Calendar display the Calendar Name, Primary Time Zone, and Owner. You can also enter the calendar’s description.
To change the primary time zone of your calendar, click on the Set Primary Time Zone button. You will be navigated to the General Settings, where you may change the primary time zone.
Access Permissions for Events
You may provide permissions for other users to view your calendar and configure them to view all event details or only free/busy events. This configuration will be reflected while others check your availability or subscribe to your calendar.

- Tick the ‘Make available for organization’ option to allow all employees in the organization to view your calendar events.
- Select ‘See all event details’ to enable your colleagues to view your event details. Select ‘See only free/busy (hide details)’ to view only free/busy status and not disclose the event details.
Subscribe to a Calendar
Users can subscribe to other users’ InfinCE Calendars; the events of that calendar can be viewed from their InfinCE Calendar.

To subscribe to an employee’s calendar, click the Add New button and select the ‘Subscribe to calendar’ option.

The Subscribe Calendar pop-up appears, where you may select the employee name whose calendar you want to subscribe to and click on the Subscribe button.

The subscribed calendars will be displayed in the Subscribed/Shared section.

The events of the subscribed employee will be displayed in your calendar in a particular color. This way, you can differentiate your events and the subscribed user’s events.
General Settings
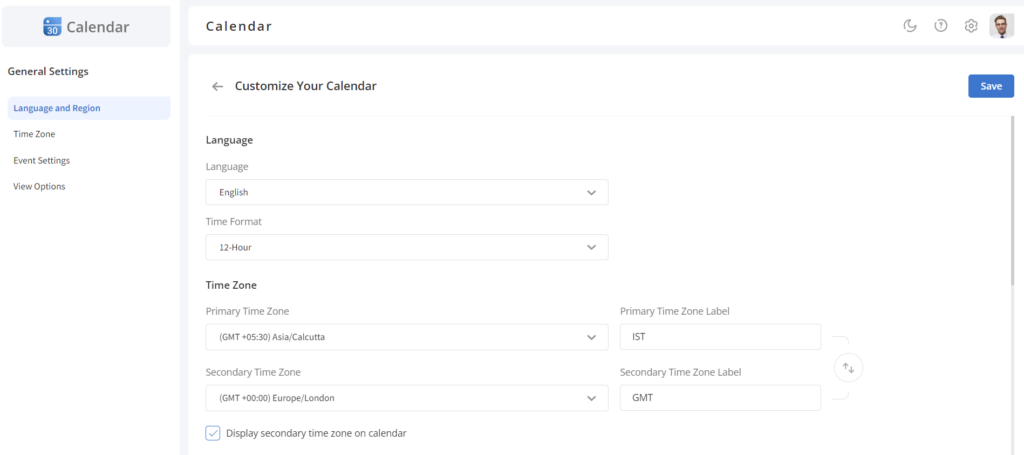
InfinCE Calendar can be customized in ways you want it to be by configuring the preferred settings. You can set your language, region, time zone, event settings and view options.
Languages
InfinCE Calendar supports various languages to display events. You may select the display language of your choice. It is possible to configure the time format as 12 hr or 24 hr for your events.

Time Zone
The InfinCE Calendar provides you the provision to set your primary and secondary time zones. You can configure your primary time zone and secondary time zone on the calendar. The events are created based on the time zone set. You may change the time zone while creating events for the participants in different time zones. Select your preferred primary time zone, secondary time zone and its labels. Click on the Swap icon to switch between the primary and secondary time zones if needed.

To display the secondary time zone in the calendar, tick the ‘Display secondary time zone on calendar’ option. Then the primary and secondary time zones will be displayed in the Calendar. Week and day view.
Event Settings
Default Duration: It is possible to set the default duration for the event as per your choice. It may be 15 minutes, 30 minutes or 1 hr. By default, the duration displayed while creating an event will be based on the default duration value.
Default Participants Permissions: It is possible to set the default participant permissions for the events. It may be to modify events, invite others or see participants’ lists. While creating an event, the participants will have the event permissions based on the default participant permissions.

View Options

- Show weekends: Displays weekends(Saturday and Sunday) on the calendar.
- Show declined events: Displays the events you have responded as ‘No’ on your calendar.
- View calendars side by side in Day View: Displays the calendars side by side in the day view, while checking the user availability / for subscribed user calendars.
- Reduce the brightness of past events: Reduces the brightness of past events.
- Start Week On: Select the day from which your calendar needs to start.
Click on the Save button to save the changes made to the General Settings of the calendar.
Admin Settings
Users with Calendar Administrative Privileges can configure the physical meeting rooms to the InfinCE Calendar. To do so, click the Settings icon at the top right corner and select the ‘Admin Settings’ option.

In the Admin Settings pop-up,
- Enter the meeting room name and description.
- Select the meeting room location. (locations are specified in InfinCE Workplace through Administration > Settings > Office Locations menu).
- Click on the Save button.
Note: Click the ‘+’ button to add another meeting room to the Calendar.

Recycle Bin
The deleted calendar events can be managed from the Recycle bin. These events are moved to the Recycle Bin, where they will be available for 30 days.

For that, click on the Settings icon in the top right corner and select the ‘Recycle Bin’ option.

- To restore the events, select the required events and click the Restore button.
- To delete the events, select the events and click the Delete button.
- Click the Empty Recycle Bin button to permanently delete all the calendar events from the recycle bin.